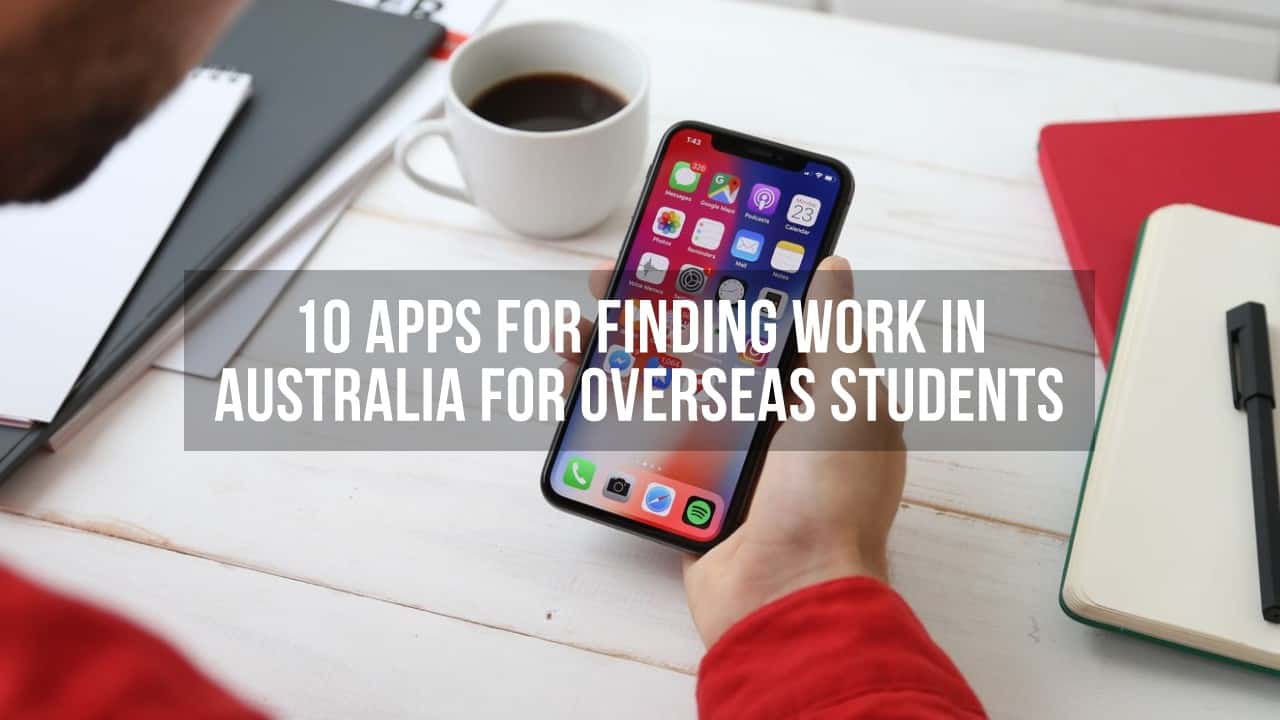
As an international student in Australia, you are allowed to work up to 40 hours fortnight during your study and unlimited hours during the holidays. If you are an international student finding work in Australia, then you must know these apps for getting some work in Australia.
So, here are 10 apps for finding work in Australia for overseas students.
1.Seek
Seek is Australia’s number platform for finding work, so undisputedly it is at the top of our list as well. There are thousands of jobs available on Seek in various cities and industries. You can also create your dedicated profile on the platform so the employers can easily search for you as well.
Gumtree is the leading marketplace for classified ads in Australia. You can not only buy and sell various items around your local area but they have many jobs available on the platform as well. There are thousands of jobs in various industries available on the platform.
Linkedin is known as a social network for professionals. You can connect people from various industries, join groups and discussion. If you are specifically looking for professional opportunities, then this is the app you need to have in your phone. You can search for opportunities through the Linkedin network.
Adzuna is a job search portal like Seek but it brings thousands of jobs from hundreds of websites in one place. So you get tons of jobs at one website itself. They also have smart algorithms, search options to meet the needs of the candidate better.
Ridesharing is becoming the preferred way to travel around cities in Australia. You can drive a car and make money on your own terms. Although you need to follow some conditions like having your car, driving licence, insurance etc. Uber is the most popular ridesharing app in Australia but there are many other ridesharing companies available like Ola, Didi etc
Apart from driving a car for passengers, you can also take a route to become a delivery driver and make money while serving people food. The good thing is that you can deliver the food by car, scooter or bike. So you don’t need to spend too much money upfront. While we mentioned about Uber Eats, there are apps like Delivery and Menulog as well that you can download for finding work.
Airtasker is an online marketplace for getting everyday tasks done from various taskers. You can start finding work in various categories: from moving house to administration task, from cleaning to digital marketing. The person who needs to get the job done posts it on Airtasker and you can send an offer to complete the task. Once the task is completed, you get paid for the job.
Sidekicker is an online staffing platform which helps connecting businesses with skilled employees for completing hourly or daily jobs. It offers flexible hours to work as you can choose when and where to work. It is free to sign up for it.
Fiverr is not only popular app in Australia but also worldwide. Fiverr is an online marketplace for freelancers servicing various businesses around the globe at affordable costs. Businesses post various jobs online and you can offer to complete them. The other freelancing platforms like 99 designs, freelancer, Upwork are also popular in Australia.
Luckily, most of us already familiar with these apps and have these social network platforms on our mobiles already, so we don’t need to download these apps separately. These apps are not only useful for social networking elements but also finding jobs are getting more popular as well. There are various groups on Facebook, Whatsapp and Wechat that can actually help to find a job.
We are not providing the links are you probably have them already on your phones.
How many out of these 10 apps you already have installed on your phone? Comment below.
Finding accommodation to live in Australia is one of the most challenging parts of overseas students life. It can be really challenging as
You usually compete with the locals for the property
You don’t have rental history
You don’t income proof as you don’t have Australian employment
You probably have no guarantors
Here in this guide, we explain the step by step on renting in Australia as an overseas student.
Step 1: Look for the property
The first step is to look for the property that you would like to rent. There are various types of accommodation options available for overseas students in Australia. You can rent a
Private rental
Student apartments
On campus and
Home Stay
You can find more information about all these accommodation types here.
Before you even decide the type of accommodation, we suggest you consider the following selection criteria for choosing the accommodation:
Budget: How much money would you like to spend?
Area: Which suburb or areas you would you like to love?
Facilities: Which facilities matter to you the most like furnished accommodation, pool, gyms etc? It is also important for students to have a nice desk and comfortable chair, as they spend a lot of their time studying.
Location: How accessible the university/college, work and shopping are from the property?
Public Transport: How far is the public transport from the property?
Although, there are many ways (e.g. student services from your institute, notice boards, newspapers or real estate agents office) you can look for accommodation in Australia but the most preferred way is to search the properties online. You can look for various rental properties on popular websites like:
Once you selected a few properties meeting your selection criteria, the next step is to inspect the property. You will need to check the property inspection open times and it is also advisable to confirm the timings with the property agents as well because sometime the inspection times might change.
Usually, the property managers will open the property for 15 to 30 minutes. In Australia, Saturday is the most popular day for the inspections. Although, there might be another days or timing available as well. The property manager may even ask for your identification and some personal details before letting you inspect the property.
After inspecting the property, the property manager may ask you if you like the property and if you would like to apply for the property. If you like the property, then you will go to step 3, if not, then you will keep inspecting the property until you find the one that meets your requirement.
It is also advisable to inspect the property before renting as some students in the past have reported that pictures shown on the websites look different than the reality,
Step 3: Application for the property
Once, you are happy with the property, you will need to proceed with the application of the property. This usually involves completing an application form and providing as much information as possible.
Some of the key information that you need to provide in this application form includes:
Personal Details including some form of identification
Employment details
Previous rental history
References from employers and previous landlords etc.
Once you submit the application, the property agent will notify you about the result of the application after discussions with the landlord. The property manager will also conduct the background, employment and reference checks as well to ensure that they are going to give rental property to someone who can pay the rent in time.
There can be quite a lot of competition in some properties so it is better to apply nice and early if you would like to improve the chances of getting a positive answer.
Step 4: Sign the lease and paying the bond
If your application is successful, the next step is to sign the lease. A lease is a legally binding contract between you (a tenant) and a landlord. A lease can be fixed term (which is for a specific time like 12 months) or a periodic lease (month by month).
This lease document will have information on:
How long a tenant can live
How much the rent will
When the rent must be paid and how
How much the bond will be
How often the inspections will be conducted
Any special conditions that tenants must abide
You will also usually need to pay the bond when you are signing up the lease. A bond is a refundable security deposit that you need to provide to landlord or property agent which they will then be lodging it to the authorised government body in your state or territory. You may need to pay an amount equivalent to 4 to 6 weeks of rent as your bond.
A bond is kept by this authority till your lease finishes and you decide to move out of the property. It is kept to ensure the rights of a landlord to cover any expenses for damages that might be caused by the tenants. It is important that you get a copy of the receipt of your bond.
If you plan to sublet the property to other tenants, then you should get approval from your landlord first. Also, it is better to have every co-tenants name on the lease as well as it legally binds them also in case something does go wrong.
Step 5: Condition report
Once you signed the lease and lodged bond, it is time to move into the property. Prior to moving into the property, your property agent or landlord must give you a condition report. A condition report is a document that records the general condition of the property and any existing wear tear or damage.
You must get this report and complete if you find any further damages or scratches or any other missing items. Once completed, you will need to give it back to your property manager or landlord. You must keep a copy of that condition report for yourself as well.
It is also advisable to take photos of any damages or scratches that happened before you move into the property to avoid any future disputes with the property manager or landlords.
Step 6: Moving into a new home and Inspections
It is time to move into the property and make it to your own. Welcome to your new home!
While you are renting the property, it is always good to keep it clean and tidy at all times. You should try to treat it like your own house. The property manager or a landlord will conduct regular inspections also to ensure that the property is well maintained throughout the lease period.
The inspections will usually be conducted at least 2 or 3 times per year if your lease is for 12 months. It can be more or less depending on the agreement that you have with the landlord or the agent.
A landlord or an agent can not inspect the property without giving you written notice. There usually restrictions on timeframes as well on when the inspections can be conducted. You usually don’t need to be present at the inspection as a landlord or a property agent keep the spare key of the property.
If while renting, there are things that need to be repaired then you can tell them to the agent or landlord when they come for an inspection. However, if the repairs are urgent then you must notify them as soon as possible.
Step 7: Ending the lease
Once the lease is over, it is up to you and landlord if you want to extend it further or not. If you are planning to move at the end of the lease, then you must notify the landlord or agent at least 28 days before the lease expires. It gives the chance to the property manager or a landlord to show the property to other prospective tenants.
When leaving the property, it is important to make sure to leave it clean and tidy. It is always advisable to leave the property the same way that it was when you moved into it. Your property manager or landlord will inspect the property after you leave. They will also do the final condition report also and if the property is not left clean or in a reasonable condition, then they might deduct the cost of cleaning or damages from your bond.
When the final inspections are done, you and your landlord or agent must complete a bond claim form after reaching an agreement on how and to whom the bond should be paid out. However, if you and your landlord or agent can’t reach an agreement then a landlord or a property agent should to the tribunal for claiming the bond in case of dispute over cleaning or damage.
You can apply for tribunal for claiming your bond as well in case you don’t receive the bond back within a few days of moving out from the property.
Also, it is important to cancel all the utilities like gas, water, electricity and internet as well. You must also notify all the businesses you expect to receive the mail from. Alternatively, you can use Australia Post’s mail redirect service for redirecting all the mail to your new address.
Where to get more help
If you need further information on renting, we suggest you contact the relevant authority in your state or territory. Here is a list of the relevant authorities for each state and territory in Australia
Many international students make the choice to study in Australia and one of the first questions that come in the mind is how do I apply for studying in Australia. In this detailed step by step guide, we will help you understand a student visa application for Australia.
We are going to break it down into various sections to make it easy for you to understand what you should be doing for applying for a student visa.
Step 1: Understanding the requirements for studying in Australia
If you are planning to study in Australia, then there are some key study requirements that you need to meet before you can apply for the student visa. We have categorised these requirements into three main areas:
Academic
Good academic records
Meeting the prerequisites of the course
English tests scores
Minimum Age Requirements
Work experience
Research work/Thesis
Financial
Course Fee
Living expenses
OSHC (Health Insurance)
English test fees
Visa application fee
Medical Check-up fee
Airfares
Immigration
Passport
Genuine Temporary Entrant (GTE)
Health requirements
Character requirements
Financial requirements
Step 2: The admission process
International students find it quite confusing and challenging in understanding the admission process. To make it simpler for you, we have divided it 5 main steps:
The first step is to choose the area you would like to study eg. Business, Accounting, Engineering IT, Hospitality, Healthcare
Then you would need to choose the level you would like to study e.g Certificate, Diploma, Advanced Diploma, Bachelor Degree, Graduate Diploma/Certificate, Master Degree or Doctorate. You can understand the Australian education system by checking this infographic.
The next step is to choose the city where would you like to study e.g Sydney, Melbourne, Brisbane, etc.
Then choose the type of institution you would like to study – University, Tafe or a Private College
Last but not the least, choose the timing/intake you would like to enrol in – February, July, and November but some private colleges or Tafes may have a year around enrollments
Step 3: Applying for COE
Here are the key steps for applying for a Confirmation of Enrolment (COE):
Write an impressive statement of purpose on why you would like to study, especially required for higher education programs.
As most of the institution will require some of form of evidence of your English capabilities (unless you come from the English speaking country) it is advisable to get your IELTS, PTE or TOEFL test done before the submission of your application form.
Complete and submit the application form for the institute you are planning to study with required documents.
Don’t forget to check if you are eligible for some scholarships before sending your application form.
If you haven’t finalised yet, you can apply for multiple institutes at the same time.
Institute may ask for more documents or for an interview via telephone or skype
After the institute is satisfied with your submission, they will send you an offer letter.
Read the offer letter and terms and conditions and if happy with them, you will need to pay the fees as mentioned in the offer letter. Most of the Australian educational institutions will require you to pay the first term or semester fee only.
Once the institute receive your payment, they will issue a COE (Confirmation of Enrolment)
Step 4: Documents required for the Student Visa application
While applying for a student visa for Australia, you will need to have few documents ready for your institute and immigration department. Here you will find the list of the documents you need to submit as a part of your student visa application:
Passport
4 Recent passport-sized photos
Birth certificate and national identification
Confirmation of Enrolment(CoE)
Form 157A
OSHC evidence of payment
IELTS or PTE or other English test results
Statement for Genuine Temporary Entrant
Evidence of funds (eg Bank statements etc)
Academic records like certificates
Police clearance certificate
Work record like pay slips, tax returns
Evidence of your relationship with your spouse like a marriage relationship
Evidence of relationship with your children
Guardian and Welfare arrangements evidence for under 18’s
The list given above covers all the major documents you may need for the student visa application. You may need to provide less or more documents when lodging a students visa application depending on your individual circumstances. Make sure to get these documents attested or certified before submission. If the documents are not in English then you will need to get it translated to English.
Do not provide any false, misleading information to the immigration as if they catch that, you might be banned from applying for any visa for Australia. This may also affect your visa application for other countries as well.
Step 5: Student Visa Application
You will need to complete all the required documents and submit the application with the applicable fees. The current visa fee is $575 but it usually changes every year. So it is a good idea to confirm that with the Australian immigration’s website.
The application can be submitted online or using paper format. The application can be done by yourself or by your consultants or agent. You must submit your application at least 12 weeks before the course start date.
Once lodged, it can take a few days to weeks to get the visa. On average it may take up to 4 weeks to get a visa but it might even take longer time depending on a few factors. The Australian government will issue you a Transaction Reference Number (TRN) once they receive the completed application. TRN will help you track the progress of your application.
If immigration requires more information or documents then they will notify you and you will need to get back to them with that within the given timeframes. As immigration department needs to verify that you are genuinely coming to Australia for study only, they can conduct an interview usually via telephone.
What kind of questions the department officers may ask?
The interview is usually conducted by trained officers and they may ask various types of questions but most of them will be related to verifying some of your details and intended purpose of traveling to Australia. The interview usually lasts around 10 to 15 mins. Some of the typical questions that the officer may ask are:
What is the purpose of traveling to Australia?
What qualifications do you hold?
Why do you want to study in Australia?
Why you would not like to study a similar course in your home country?
Have you ever visited Australia before?
Do you have any family or relatives living in Australia?
How did you find your study institution?
Why do you want to study at that specific institute?
Where is this institute located?
Please give more details about the course you are intending to study?
How this course will help your career?
What is the course start date and end date of the course?
What is the cost of the course?
What is the refund policy for this institute?
Who will sponsor your study?
What is your income or family income?
How you will ensure that you will go back home after studying in Australia?
What if your visa is refused?
What is OSHC (Overseas Students Health Cover)?
Why it is necessary for overseas students to take OSHC?
Step 6: Visa Outcomes
The immigration department will make final decisions on your application and will notify you or your nominated agent by email. If you have been granted a visa then you will need to start preparing for Australian arrival.
If unfortunately, your application is rejected by the immigration department then you may have a chance to appeal against the decision to Administrative Appeals Tribunal (AAT). If you believe that your visa application was refused unfairly then you will need to prepare and present your case to AAT. This process can be challenging and you might need help from a lawyer who understands the Australian migration law well.
For most cases, students will need to re-apply for the student visa if they still intend to study in Australia.
Why your visa has been rejected
While there can be various reasons why immigration can refuse your visa but some of the most common reasons for refusing the student visas for Australia are:
Failing to provide the correct documents
Misleading, bogus or fraudulent information
Choosing a course that might not be relevant to the previous studies
Lack of research into the prospective institute
Unable to demonstrate the required funds for studying
No solid plans after studying in Australia
Failing the medical examination
Not satisfying the Genuine Temporary Entrant requirements
Well, we hope this guide gives you a complete picture of how to prepare for your student visa application better. We would love to hear your thoughts, experiences, and feedback on a student visa application in the comments below.
It is quite obvious that the grading system varies from one country to the other. It can be quite challenging for overseas students to understand the Australian grading system, especially when they are new here. We have seen overseas students getting upset about the “D” grade in the Universities and TAFEs, so we created this nifty guide about Australian grading system at various education levels.
Please note that each and every state, university or institute may have different percentages and grade names. You may need to check with your university or institute about the grading system they use.
Universities Grading System in Australia
First, let’s have a look at the university grading system. Although most universities will have similar grading scales which includes grades given below, some universities may have different percentage scales.
The grading scale given below is for undergraduate (Bachelor Degree Programs) and postgraduate programs (Master Degrees Programs).
Grades
Grade Description
Grade Scale (%)
GPA
UK Equivalent
US Equivalent
HD
High Distinction
85 – 100
7.00
First Class
A+
D
Distinction
75 – 84
6.00 – 6.99
Second Class – Upper Division
A
C
Credit
65 – 74
5.00 – 5.99
Second Class – Lower Division
B
P
Pass
50 – 64
4.00 – 4.99
Third Class
C
F
Fail
0 – 49
0.00 – 3.99
Fail
F
If you are planning to study a Degree with Honours, your grades will look different than the usual undergraduate and postgraduate grades. Honours Degree is usually an additional year of study after completing an undergraduate degree.
It usually requires a student to complete independent but supervised research in their field of study after completing the third year of a Bachelor’s degree.
Grades
Grade Description
Grade Scale (%)
H1
First Class Honours
80 – 100
H2A
Second Class Honours (Division A)
75 – 79
H2B
Second Class Honours (Division B)
70 – 74
H3
Third Class Honours
65 – 69
P
Pass
50 – 64
N
Fail
0 – 49
You can also search for various universities, TAFEs and private colleges on our search engine.
GPA and ATAR
Unlike the USA, GPA’s (Grade Point Average) are not often used in the Australian grading system. Most commonly they are used in Medicine or Law stream courses. For those who don’t know, GPA is a numerical calculation that helps to evaluate students academic performance in each study period or over the whole course.
It is calculated using the following formula:
GPA = Sum of ( Grade Point × Credit Points ) ÷ Sum of ( Credit Points )
While GPA is not a very popular method of grading in Australia, ATAR (Australian Tertiary Admission Ranks) score is one of the key scale used in measuring the student’s performance in Australia. Students who exceed certain ATAR threshold are eligible for government-sponsored opportunities and positions.
Universities in Australia using GPA usually have either 7 points GPA scale or 4 points GPA scale. The following table explain about the GPA scale system in Australia:
Grade Scale (%)
7-point GPA Scale
4-point GPA Scale
UK Equivalent
US Equivalent
85 – 100
7
4
First Class
A+
75 – 84
6 – 6.99
3
Second Class – Upper Division
A
65 – 74
5 – 5.99
2
Second Class – Lower Division
B
50 – 64
4 – 4.99
1
Third Class
C
0 – 49
0 – 3.99
0
Fail
F
Now let’s look at each and every state and territories grading system in Australia.
Australian Capital Territory Grading System
The educations institution in the Australian Capital Territory (ACT) uses the following grading system:
Grade
Grade Description
Grade scale %
A
Extremely High Standard of Achievement
100 – 85
B
High Standard of Achievement
84 – 70
C
Acceptable Standard of Achievement
69 – 50
D
Limited Standard of Achievement
49 – 25
E
Very Limited Performance
0 – 24
New South Wales Grading System
The table below shows the grading system used by the educational institutions in New South Wales:
Grade
Grade Description
Grade scale %
A
High Distinction
100 – 85
B
Distinction
84 – 70
C
Credit
69 – 50
D
Pass
49 – 25
E
Fail
0 – 24
Northern Territory Grading System
Northern Territory institutions use the following grading system :
Grade
Scale 1
Scale 2
A
5
17 – 20
B
4 – 4.99
14 – 16.99
C
3 – 3.99
11 – 13.99
D
2 – 2.99
8 – 10.99
E
1 – 1.99
0 – 7.99
Queensland Grading System
The table underneath explains the grading system adopted by the educational institution in Queensland:
Grade
Grade Description
Grade scale %
HD
High Distinction
7
D
Distinction
6 – 6.99
C
Credit
5 – 5.99
P
Pass
4 – 4.99
F
Fail
1 – 3.99
South Australia Grading System
The institution in South Australia uses the following grading system:
Grade
Grade Description
Grade Scale %
HD
High Distinction
85 -100
D
Distinction
75 – 84
C
Credit
65- 74
P1
Pass Level 1
55 – 64
P2
Pass Level 2
50 – 54
F1
Fail Level 1
40 – 49
F2
Fail Level 2
30 – 39
Tasmania Grading System
Tasmanian institutions had adopted the following grading scale since 2003:
Grade
Grade Description
Grade scale %
EA
Excellent Achievement
4.00
HA
High Achievement
3.50 – 3.99
CA
Commendable Achievement
3.00 – 3.49
SA
Satisfactory Achievement
2.50 – 2.99
PA
Preliminary Performance
2.00 – 2.49
Victorian Grading System
The educational institutions in Victora use the following grading system:
Grade
Grade Description
A
B
C
D
E
Lowest grade needed to pass
F
Fail
Western Australia Grading System
The table below explains the grading system adopted in Western Australia:
Grade
Grade Description
Grade Scale (%)
HD
High Definition
80 to 100
A
Excellent Achievement
80 to 100
B
High Achievement
70 to 79
C
Sound Achievement
60 to 69
D
Limited Achievement (lowest grade needed to pass)
50 to 59
E
Fail
0 to 49
Vocational Education and Training Grading System in Australia
The vocational education system in Australia does not have university-style grades but rather based on the concept that you can either complete the task or not. So those students who are planning to undertake qualifications like Certificates (I to IV), Diploma and Advanced Diploma may get different grades in their certificates than at the university levels.
If the institute decides to use the grading system, it might use the same scales as university undergraduate scales (given above). But since vocational education is based on competency levels rather than grades, most of the vocational education provider will use grades like these:
Grades
Grade Description
Grade Scale (%)
C / S
Competent (Pass) / Satisfactory
100%
NYC / NS
Not Yet Competent (Fail) / Not Satisfactory
0%
Primary, Secondary and Senior Secondary Grading System in Australia
In Australia, every state and territory has their own grading scales, so it is extremely important to understand that grades may look different than the one given below in the table. As an overseas student, you can study in Australia after the age of 6.
Usually, the result reports of the students are given to the parents at least 2 times a year using the grading scale between A to F. Overseas students who are planning to study at Primary and Secondary level education in Australia, your grades may look something like:
Grades
Grade Description
Grade Scale (%)
A
Excellent
85 – 100
B
Good
70 – 84
C
Satisfactory
51 – 69
D
Limited
31 – 50
E
Very Low
26 – 30
F
Fail
0 – 25
If you would like to watch a quick summary of this guide in our video, you can watch it here:
In most of the universities, it will be considered as Credit (C) or Distinction (D) in Australia.
Is 75 an A in Australia?
Most of the universities in Australia will consider anywhere between 70 and 84 score as a Distinction which is equivalent to A in the states.
Is a GPA of 6 good in Australia?
GPA of 6 and 7 are considered as an excellent score in Australian universities and among Australian employers. GPA of 6 or 7 means Distinction or Higher Distinction.
What grade is 60 percent in Australia?
In university settings, it will be considered as Pass (P) which pretty average score in Australia.
In this blog, we are going to explain things you need to know about driving in Australia.
Let’s go.
Can I drive in Australia on my overseas licence?
One of the biggest questions in an overseas student’s mind is that can I drive on my overseas licence in Australia?
International students are considered as temporary residents in Australia which means you are allowed to drive with your home country licence but some states and territories have strict laws regarding this.
As an example, the Northern Territory does not allow overseas students to drive more than 3 months of their arrival with an overseas licence.
We suggest you to check with your local transport authority to see if you are allowed to use your overseas licence or not. Also, please make sure you have a valid visa and your driving licence is current as well.
We also suggest you have an international licence done before coming to Australia. If your licence is not in English, please get it translated in English before coming to Australia.
Very important information – If you become Permanent Residence (PR) of Australia, then you will need to get an Australian Licence within the first 6 months of getting PR. You will not be allowed to drive in Australia on overseas licence after that.
Getting an Australian driving Licence
In order to get an Australian licence, usually, you have to go through some tests unless you are from
There are three types of tests, you will need to go through with. These are
Learner Test
Hazard Test
Driving Test
Most states and territories will have a first test known as Learners test where you will need to complete the test in local transport authorities office on the computer.
The second test, Hazard test, is also conducted in the same authorities office, and you need to analyse and assess the hazards while driving a car in a simulated environment. This test is also conducted via computer.
The third and last test is a Driving Test, where you will need to drive along with the observer, who will observe your performance while driving the car. The observer will ask you to drive a car in certain areas around their office and they also ask you to actually do certain driving tasks like parking, reversing etc.
You will usually need to book all these tests in advance and there is a fee involved with each test. Once you successfully complete all the tests, then you will be issued with a probationary or a full licence depending on your situation.
Road Rules
Here are some common rules that you must follow in Australia in order to avoid accidents and penalties:
Drive on the left side of the road
Don’t drive while or after drinking
Always wear safety belts while in the car (including passengers)
Kids younger than 7 years must be in their own special car seats
Don’t litter or throw anything from your car on the road
Always carry your driving licence while driving
Never use a mobile phone while driving
Always be careful of speed limits and make sure to follow them
These are some basic road rules, and you will need to abide by them if you are going to drive in Australia.
If you are caught breaching of any of the mentioned rules, then you can get fined for that. The fines in Australia are very high so it is advisable to avoid as many as you can and follow these rules.
Buying a car
If you are planning to buy a car in Australia, then you should consider the cost of buying, running and maintaining a car.
Where you can buy the car?
You can buy the used or new car from:
Local authorised dealers
Reseller dealers
Private sellers
Auctions
Additionally, many people in Australia, post their car ads online on various websites, so we suggest you to check them;
Carsales.com.au
Gumtree.com.au
Drive.com
Autotrader.com.au
Carsguide.com.au
How to buy a car in Australia?
We will make it easier by putting this in a few steps
First of all, you will need to decide whether you want to buy a new or used car.
Then decide on how much would you like to spend for buying a car (your budget). You can actually buy a used car as cheap as $2,000 in Australia.
Then you need to do your research about the car. We suggest you to check online first to see what’s available and what fits your budget
Then make an arrangement to view and inspect the car with the dealer or a private seller
After inspecting and if you the car meets your requirements, then you need to formalise some paperwork
Always get to know about the car history, any loan amount still due and known mechanical or technical issues with the car before signing anything.
Also, it is important to ask for a car with a roadworthy certificate (which means a car is worth driving on the road without being a risk for you and other drivers).
By law, dealers must sell the car with a roadworthy certificate, but private sellers are not obliged to, so make sure to ask for that.
We also suggest you get a car checked by a mechanic before you decide to buy it. Most of the sellers won’t have a problem with that.
Last but not least, after signing the paperwork, you may need to bring the documents to the local transport authorities for transfer of ownership
You might have to pay extra costs like Stamp Duty and taxes when purchasing a car from a private seller.
Once, all the formalities are done, then you are good to go with the car to drive.
How much will it cost me to buy, run and maintain a car?
Owning, running and maintaining a car can be an expensive affair for overseas students. So, we suggest you really consider that you need a car before buying one.
The reason for that is not only costly but also the public transport system in Australia is very good in most of the cities. So it much easier to travel around the city and suburban areas.
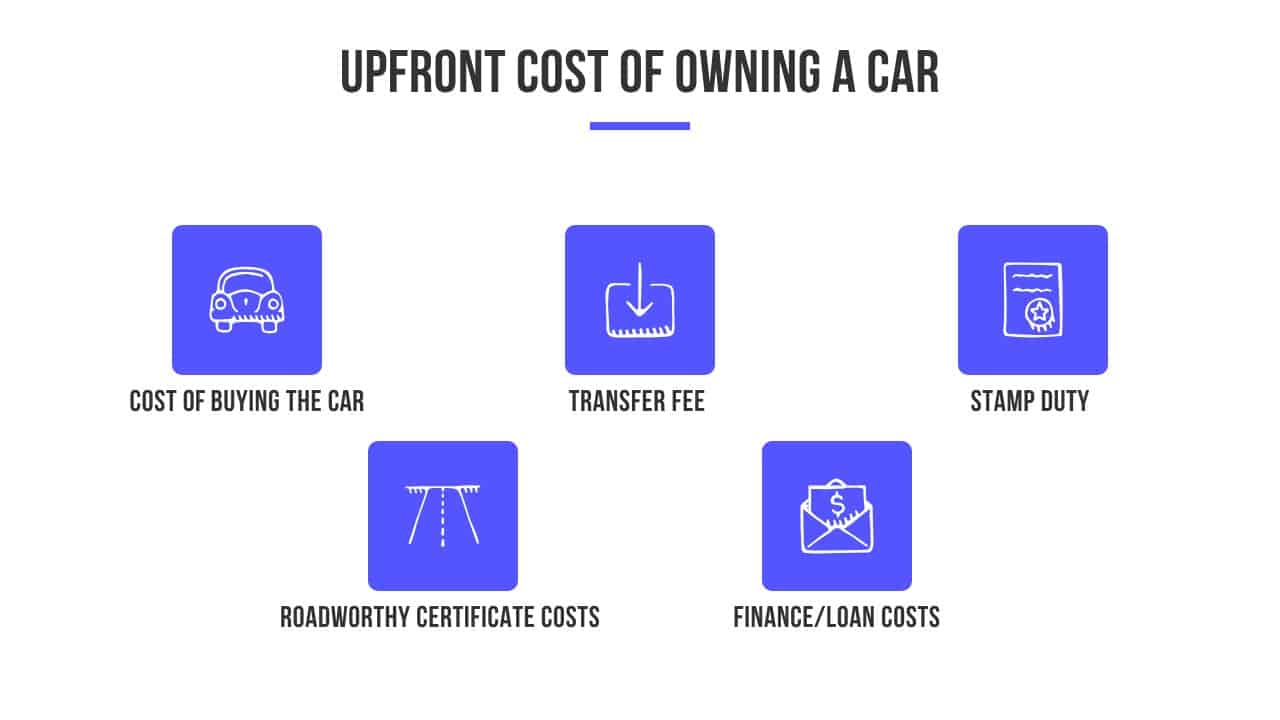
The costs of the car can be split into two main categories. These are upfront and ongoing costs of the car.
Below you can check the average cost of owning a car in Australia per year. Source: Finder.com.au
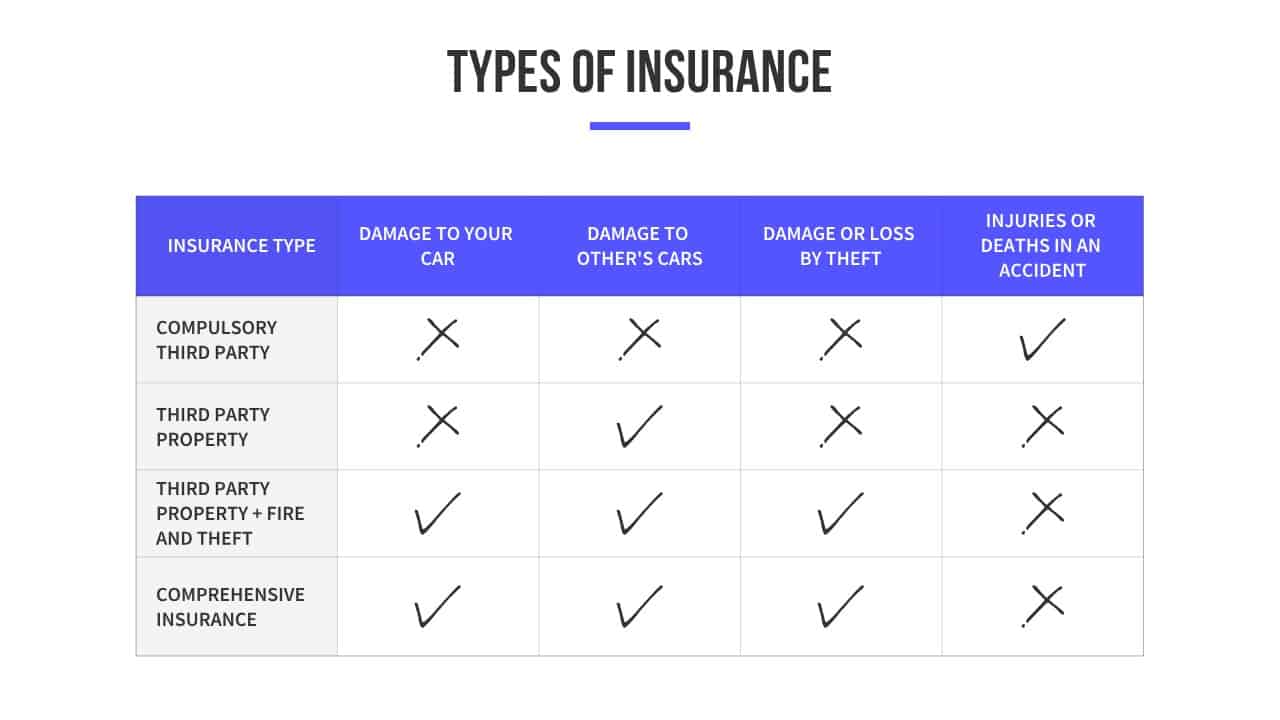
Car insurances are required to cover any costs that may arise due to any accidents on the road which damages your car or property and the other parties There are few types of insurances you can take to cover the damage to your and other’s car and property. These are
Compulsory third party
Third party property
Third party property, fire and theft
Comprehensive
The table below shows what these insurances cover and not cover
Relevant State and Territory licencing authorities
Also, as discussed in the video, each and every state and territory has its own set of rules and regulations regarding licencing. So please check the link of your territory and state’s motor authority in order to find more details about it.
Here is a link to all the Australian Transport Authorities in each state and territory:
While catching a bus is a simple thing as it is but there are few things you should be mindful of when catching a bus in Australia. This guide cover details regarding everything you should know about catching a bus and having a pleasant journey in Australia. Here are the details:
Planning a Trip
It all starts with planning your journey before even you travel. It is important to understand the timetables, nearest bus stop and the routes bus may travel before you decide to get on one. We suggest you to check timetables by:
downloading an app for your local bus/transport service in your city.
visiting their website.
getting a printed copy of the timetable from the local stations or sometimes even in the bus itself.
checking the timetable at the bus stop as well.
calling the hotline of the service provider.
Boarding the bus
Once you know the timetable and the route, we suggest you to follow these instructions
Always be at your bus stop at least 5 mins prior to the bus arrival time
Be sure that you can see the driver and driver can see you at the stop
If boarding, wave at the bus driver to stop the bus
Always let other passengers get out of the bus first before boarding
If you need assistance, ask the driver to lend you a hand
Some buses can be lowered down for meeting the needs of disabled and wheelchairs ramps are also available in most buses
If the bus doesn’t stop, there is a possibility that the next one is coming in a few mins only
Recognising your bus
You can find out whether the approaching bus is the one you need to board by looking at the number and the destination displayed, usually, above the windscreen. This display shows the route number and the destination of that bus route.
If you are still unclear or there is no display of the route and the number, it is better to ask the bus driver by waving at it to stop.
Paying the fare
It is important to pay your fare while travelling on any public transport in Australia including buses. Fare evasion is an offense in Australia and you can get the penalty for not paying the fare.
Usually, the fares are charged based on the distance you travel from point A to B. If you are paying by your transport card (ticket), then make sure you have enough balance in your card before travelling.
If paying by the cash, just remember these things:
Always bring correct change
Tell your driver about the fare you want and
Be ready to show your student or concession card
Understanding the ticketing system
Every state and territory have their own public transport ticketing system. In some areas, you can get away by paying cash for your fare to the driver while others you may need a card to pay the fares.
We have an infographic that tells you about the public transport ticketing system used in various cities in Australia here.
While concessions are available to all overseas students in most of the Australian cities. Major cities like Sydney and Melbourne have a restricted transport concession for overseas students. Please check the list of transport authorities to see if you are eligible to get a travel concession in your city. Links are given below.
Disabled and priority access
Most of the buses have a facility to accommodate the needs of the disabled, pregnant and travellers with children. So if you have a need to travel with pram, wheelchair, scooter, you will be welcomed to travel in the bus.
Most of the bus drivers are well trained and friendly and will be happy to accommodate any specific disability or access needs as well. Always follow the instructions of the driver in order to ensure your safety and safety of others.
Getting off the bus
Once you are approaching your stop, you will usually need to press the button in order to let the bus driver know to stop the bus. If you have to touch off your cards or tickets, make you sure you do that before getting off.
Bus drivers are not allowed to stop the bus other than the designated stops. We suggest you to keep seating until the bus comes to a complete stop. Once you get off the bus, don’t attempt to cross the road in front or behind the bus.
Health & Safety
Yours, other passengers and the bus driver’s health and safety is of prime importance. Here are some safety tips to keep in mind when travelling on a bus in Australia:
There are CCTV cameras installed across all the buses in Australia
In case of emergency, there are safety exit doors available to safely escape
There is usually a fire extinguisher close to the driver’s seat in case of fire
Make sure to hold on to railing especially when standing in the bus as sudden braking might be required in certain situations
Always let other passengers get out of the bus first before boarding
Bus drivers are well trained in handling various difficult situations
If you feel threatened or unsafe, report that to the bus driver
If it is an emergency situation, please call 000 from your phone as soon as possible
Don’t eat or drink in the bus. It is even an offence to eat and drink in certain cities and you can get a fine for that as well.
Drinking water is allowed though.
Lost and Found Property
If you lost something on any public transport including buses, it is best to contact the customer service office to get assistance. Lots of time people who find the lost property, give it back to the bus drivers or customer service officers at the stations. You can arrange to collect that item once found.
Same goes for it when you find someone’s property. You can give it back to bus driver or customer service officers at your nearest station.
Where to get more information
If you need more information or need to contact your local transport authority, you can find each of them given below: